Members Login
Username 
 
Password 
    Remember Me  
 

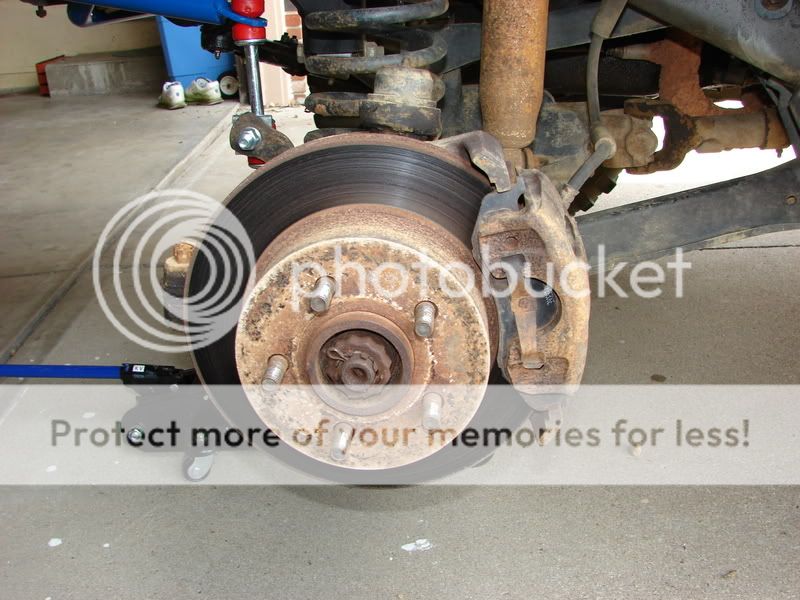
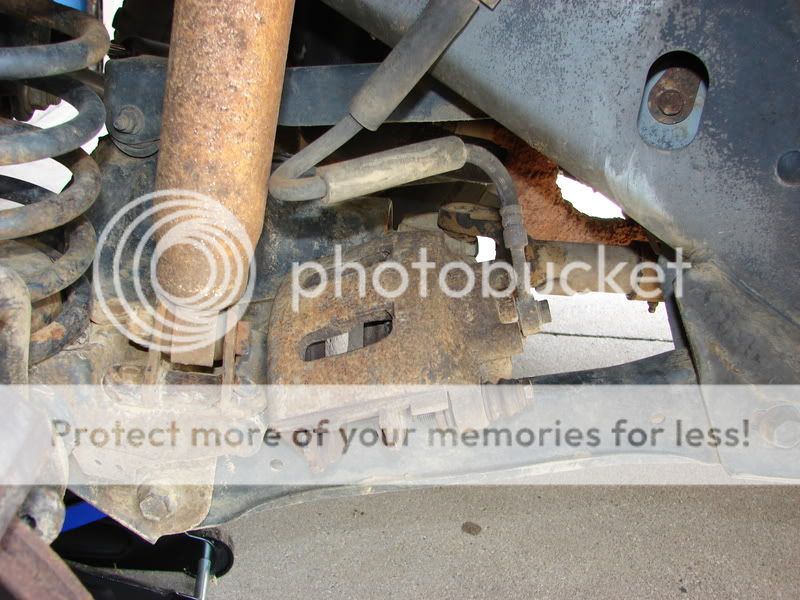
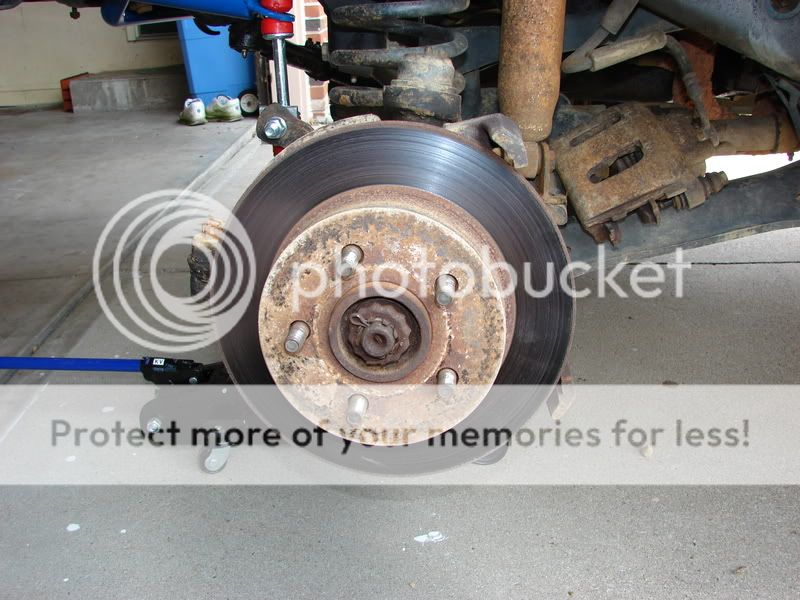
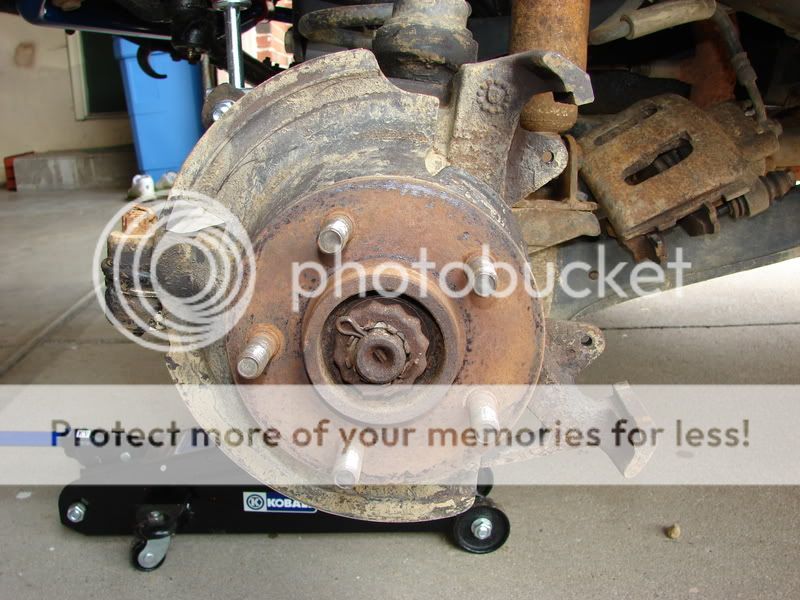
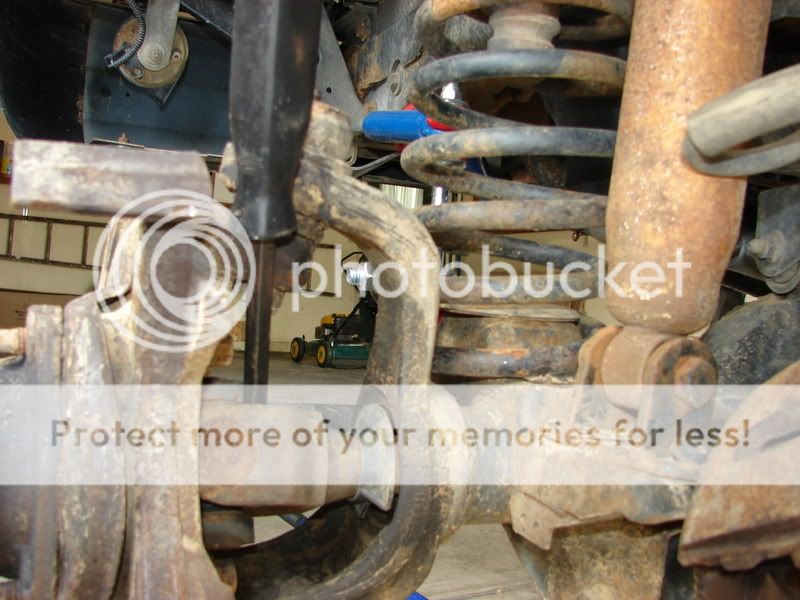
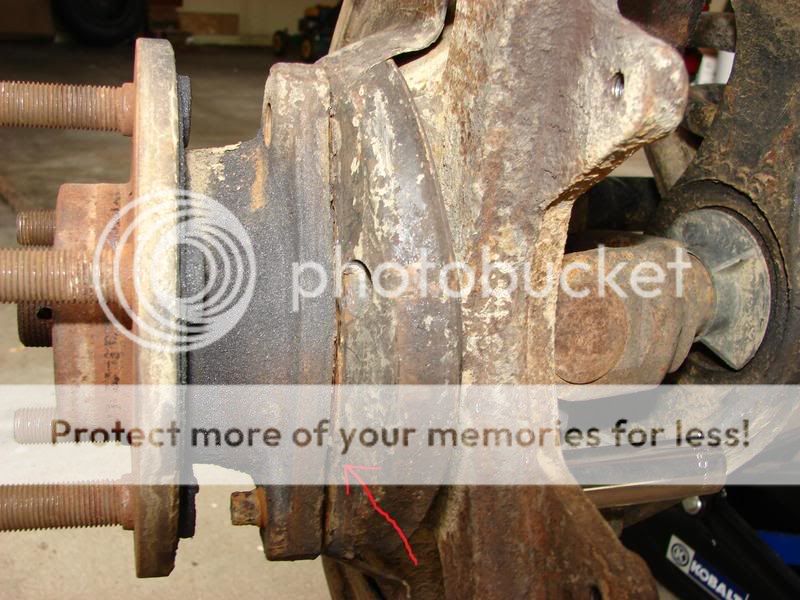
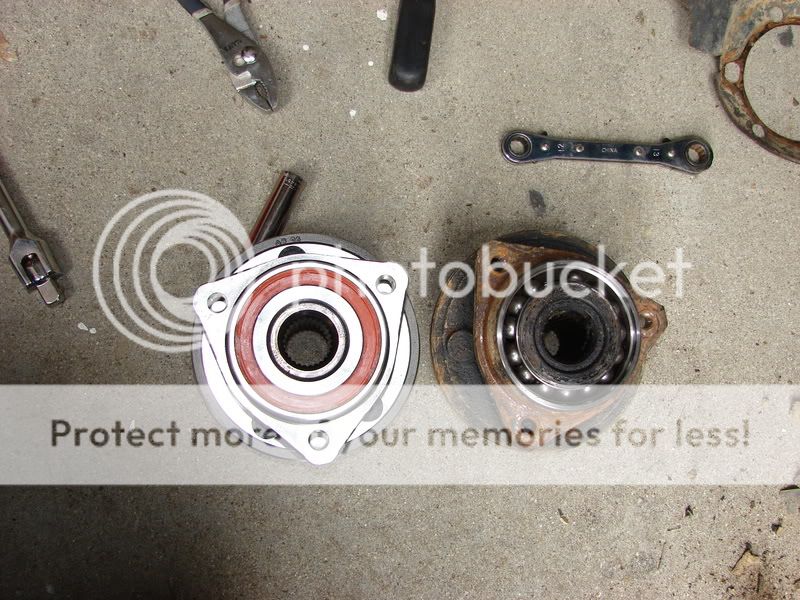
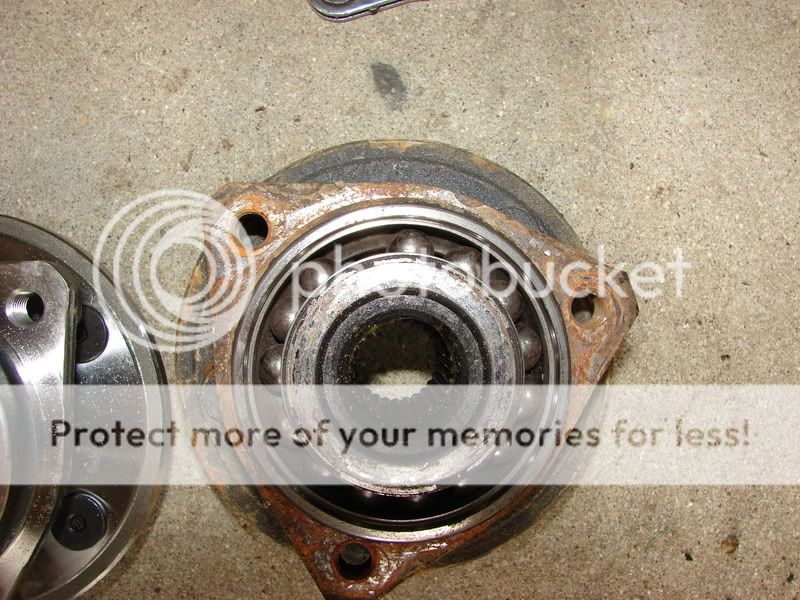
Topic: **Write Up** Front bearing replacement

Post Info
LIFETIME MEMBER
Status: Offline
Posts: 3094
Date:
**Write Up** Front bearing replacement

Well replaced the U-joints in the XJ a few months ago and had to beat the hub off of the driver's side to get it off.  So I knew it was only a matter of time before the bearing went out.  Lets just say, it went out and so I figured I would do a write up on it.

First step in the replacement, disconnect the negative battery terminal from the battery.... confused   Sorry had to.

Pic of the tire, take off the lug nuts:


It will look like this, you next need to take off the brake:


You will need to remove these two bolts, they are pictured almost all the way out so they could be seen easier.  I think if I remember correctly they are a 13mm:


Put the brake somewhere that it is not hanging by the lines.  This is not good for the lines and can cause more problems down the road.  I put mine on the control arm:


Next take off the rotor:


This is what it should look like now:


Pull the cotter pin in the middle there and take the cap thingy off that it holding on.


This is what it looks like now:


The big nut in the picture above is what comes off next.  The size is 36mm for that nut.  To get it off, it will just spin unless you prevent the shaft from moving.  I just put a pry bar in the u-joint to prevent it from turning.:


Here is what it looks like with the big nut off:


Next you will need to take off the 3 bolts holding the hub on, they are size 13mm.  They will be on the backside of the hub.  Here are two pictured:


And the third one:


Now the fun part, getting the hub off.  If it is like most it will be practically rusted on there.  This is what got me here in the first place, like stated at the beginning of the post.  I beat mine off with a sludge hammer the last time, and screwed up the bearing.  I did some more research and found a different way, and it only takes about 30 seconds, as apposed to 5 min. of sludge hammer action.  Here is a pic of the seam that needs to have a gap in it.  Before pic:


Now to get it off easily.  The 3 bolts holding the hub on, you will want to only loosen the bottom two to leave about a 1/2" gap.  You can see the gap in this picture.  Then take a deep well socket a size or two bigger then the size of the bolt, I used 14mm, and put it on the bolt pictured here:


You take the wheel and turn it until it is wedged up against the other metal parts.  You can see in this pic where the metal is scared from the socket being wedged:


Once it is wedged, turn the XJ on and let the power steering do the work.  It doesn't take much turning of the wheel and it will pop.  I did this to both sides of the hub, you could probably get away with only doing it once though.  Now look at the gap that we have in the seam:


With a screw driver and a few seconds of prying you can walk it write off.  So much easier!!!

Here are a few pics of the new and old parts.  You can see that the old one is ugly. 


You simply put it all back together and you are done.  It took me 1 hr and 5 mins from start to finish. 
If I didn't call something the right thing or did things out of order, oh well, it worked for me.  I hope that this helps some of you out.  The deep well socket is a miracle worker, use it, it is SOOOO much easier then the alternative.


-- Edited by aci4369 at 02:33, 2008-08-02

__________________

'99 XJ, 5.5" lift, 33" MT's
'11 Dodge Charger

I miss the days that they made toys that could kill a kid.

*Support our Troops*


My Pics and Specs

My Build Thread

GLXJ PRESIDENT
Status: Offline
Posts: 3934
Date:
So I take it you got it on. biggrin

__________________
'93 XJ Cherokee Sport - build thread
'89 XJ Cherokee Laredo - build thread
'88 MJ Comanche Pioneer SWB - build thread
'87 MJ Comanche LWB
'94 YJ Wrangler - build thread


glxj_banner.jpg
Guest
Status: Offline
Posts: 1078
Date:
I need to do this. Thanks

__________________

99 sport.
rust bucket, DD, 3 car seats
04 wj (w/3 car seats too)
DD duty for the lady  

LIFETIME MEMBER
Status: Offline
Posts: 1579
Date:
This is more for Lead, or another PIC (person in charge) of this website...

we ought to have a sticky with links to all of the writeups members have made, kinda like a member made 'tech info' area (http://www.greatlakesxj.com/tech.html)

on the other hand, putting links to the member created writeups in the tech section would make it 'one stop shopping' for our XJ technical needs.


ACI: great writeup, good pics and it's great you took the time to highlight the subject (such as bolts that are circled). Pretty cool.

__________________

My Fleet
1996 XJ "Snowball"- 3.5" lift, bunch of little mods.  I hate pegleg rear axles!
1974 AMC Javelin "Jade Grenade"- 360v8, 4sp, green inside and out. Underfunded Project.
2009 Kawsaki Vulan 900 "Rocket III"- Summer DD

LIFETIME MEMBER
Status: Offline
Posts: 3094
Date:
Thanks, I know how much it helps to have good pics with instructions so I thought that I would share the wealth on this one....

__________________

'99 XJ, 5.5" lift, 33" MT's
'11 Dodge Charger

I miss the days that they made toys that could kill a kid.

*Support our Troops*


My Pics and Specs

My Build Thread

Guest
Status: Offline
Posts: 229
Date:
nice write up.. i should have taken pics when i did mine.. i just used a gear puller to pull my hub out.. lol i like your idea better.

__________________
1993 Green xj 4x4
-2.5l
-ax5
-chrysler 8.25
-279,000 on the clock and counting

2007 Ninja 650r
Guest
Status: Offline
Posts: 470
Date:
Awsome I have putting it off for a while

__________________
To build something that can run over the idiot driving 45 in the passing lane ,Now Thats Talent!
Supporting Member
Status: Offline
Posts: 208
Date:
I noticed one picture of the rotor you titled "brake caliper". It should be rotor.

Other than that, Great write up!

__________________
-Chris

~97 GMC Sonoma - 2.2L 5spd DD
~77 Ford F100 - 351M/400 C6 Project, soon to be DD
~89 Ford Bronco - 302 AOD 33x12.5 Trail rig - Stocker for now

Bronco in a Jeep club! :biggrin:
LIFETIME MEMBER
Status: Offline
Posts: 3094
Date:
Fixed it, thanks

__________________

'99 XJ, 5.5" lift, 33" MT's
'11 Dodge Charger

I miss the days that they made toys that could kill a kid.

*Support our Troops*


My Pics and Specs

My Build Thread

Guest
Status: Offline
Posts: 309
Date:
Andy if we ever meet I owe ya a beer for this life saver.  Last time I did a unit bearing on my old ram it took for ever to beat the dang thing off.  I was going to do your trick with the deepwell socket, forget I left my ratchet on one of the lower bolts and turned the wheel.  Heck that even did the job - came off in seconds. 

__________________
07 Powerwagon, pretty much stock besides Line X bedliner and dual exhaust.  Quad cab, fully loaded (minus nav), etc

92 XJ sport, 33" boggers, 4.56 gears, rear locker, more to add

07 Arctic Cat 400 4x4, lockers front and rear, 2500lb MM winch
LIFETIME MEMBER
Status: Offline
Posts: 3094
Date:
rofl.gif  
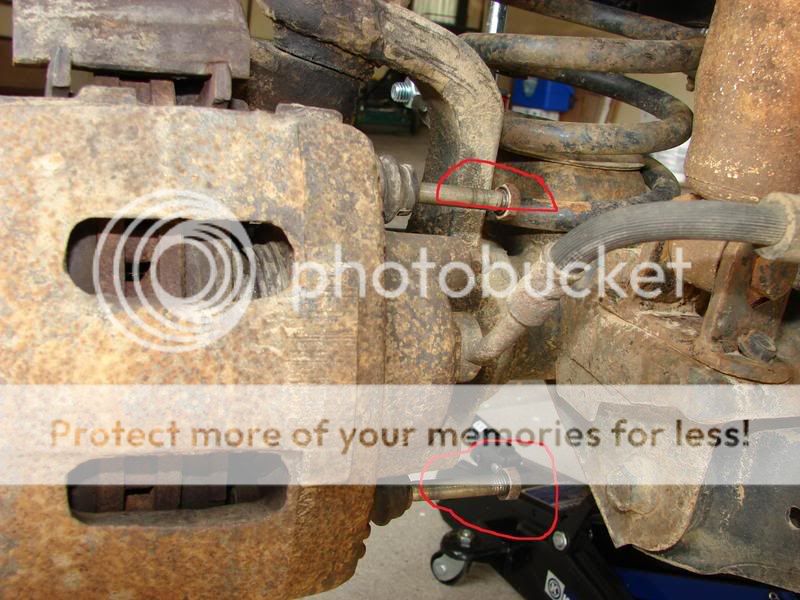
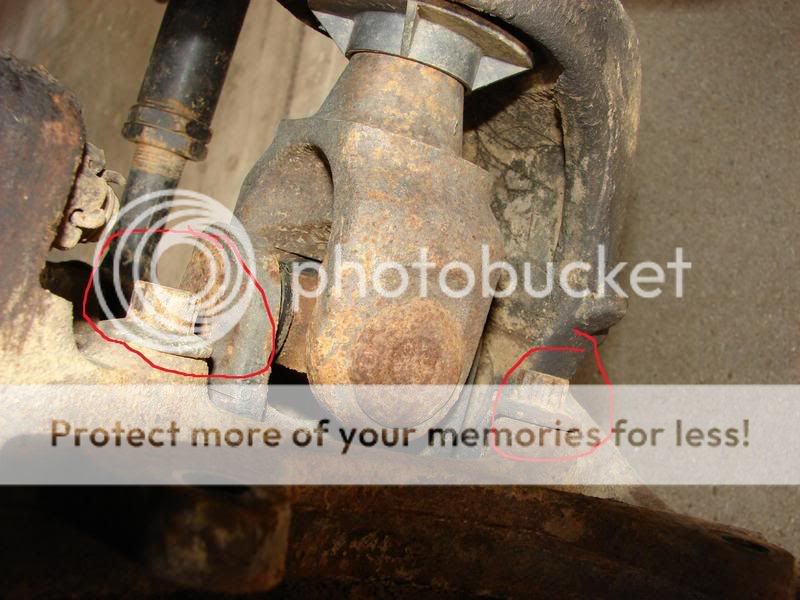
I did it the hard way once before too.   Then did some research because there had to be an easier way....

__________________

'99 XJ, 5.5" lift, 33" MT's
'11 Dodge Charger

I miss the days that they made toys that could kill a kid.

*Support our Troops*


My Pics and Specs

My Build Thread

LIFETIME MEMBER
Status: Offline
Posts: 1579
Date:
we need a thread with the ujoints too! (my front end clicks sometimes when turning near full lock, depends on wheel speed, and no tire rub with 2" lift, stock tires)

__________________

My Fleet
1996 XJ "Snowball"- 3.5" lift, bunch of little mods.  I hate pegleg rear axles!
1974 AMC Javelin "Jade Grenade"- 360v8, 4sp, green inside and out. Underfunded Project.
2009 Kawsaki Vulan 900 "Rocket III"- Summer DD

LIFETIME MEMBER
Status: Offline
Posts: 3094
Date:
For the u joint you do all the above steps except you press the ujoints out and press the new ones in.

__________________

'99 XJ, 5.5" lift, 33" MT's
'11 Dodge Charger

I miss the days that they made toys that could kill a kid.

*Support our Troops*


My Pics and Specs

My Build Thread

Guest
Status: Offline
Posts: 8
Date:
Cheers!  I could not get my hub to budge and I did not want to make ANOTHER trip to the parts store to get the puller I should have already known about, so I logged on and found this thread.  I can't wait to show off this trick when one of my buddies needs help.  Thanks.

__________________
'90 MJ
5 speed
6" Rusty's
35" BFG AT's
Flowmaster
Optima Redtop
LIFETIME MEMBER
Status: Offline
Posts: 3094
Date:
Glad to see that it helped.  But I cannot take credit for this idea, I saw it somewhere on the internet and used it the SECOND time that I did had to do this.  That just so happend to be the time that I did the write up.

__________________

'99 XJ, 5.5" lift, 33" MT's
'11 Dodge Charger

I miss the days that they made toys that could kill a kid.

*Support our Troops*


My Pics and Specs

My Build Thread

 
Page 1 of 1  sorted by
Quick Reply

Please log in to post quick replies.


Create your own FREE Forum
Report Abuse
Powered by ActiveBoard